PCI Express development on the cheap (well, sort of)
So I've been meaning to play with FPGAs and PCI Express for such a long time already now and, in light of some recent events, I decided that it's about time to finally take action. This post gives an overview of the hardware setup I arrived at using the PicoEVB development board with a Xilinx Artix 7 FPGA and a PCIe x1 Gen 2 host interface. The best thing about this is that you can get it starting at just $199 + shipping!
I was looking for a Xilinx kit specifically, and one that is also supported by Enjoy-Digital's open source LitePCIe project ("a small footprint and configurable PCIe core powered by Migen & LiteX") because I'd like to be able to experiment with these "new-fangled" HDLs, too (eventually). At work we have an AC701 evaluation kit from Xilinx, also with an Artix-7, but I didn't bother asking if I could borrow it because it's quite expensive ($1.295) and I'd be constantly worried not to damage the thing. Not fun. So I started searching the Web and stumbled upon the PicoEVB. I have to admit that I was rather judgemental of the board, mostly because of the unusual M.2 2230 form factor and the obvious scarcity of I/Os, connectors, anything. There just wouldn't be that much to evaluate, I thought. But then it dawned on me. For evaluating/prototyping PCI Express designs, the board does have everything that's needed at least to get started: An FPGA; flash memory; a built-in USB JTAG "cable"; a PCI Express interface, of course; and a couple of LEDs. No frills. It's supported by Vivado's free WebPACK edition and Enjoy-Digital's open source LiteX framework and LitePCIe in particular; probably also Symbiflow. Sample project, Linux drivers, various open source utilities all available. What more do I actually want? CrowdSupply offer was $219 + $25 shipping to Germany. Deal! Placed the order, and 5 (!) days later a small parcel arrived from some Mouser facility in Munich, Germany. (Now I do wonder about those shipping fees though!?)
So far, so good. But there's still the unusual (for an eval board that is) M.2 form factor. Well, it was clear to me from the beginning that I would have a setup with two boxen, one main workstation for development & simulation etc. and one "dumb" secondary host with the eval board (whichever it would be) plugged in to do the actual live testing on. I remember this being mentioned in some blog post way back when I first started looking into this kind of stuff, and I strongly recommend you follow this advice, too (at least for the time being). The thing is that the FPGA, via PCI Express, has access to the entire (physical) address space of its host, including kernel space. So when you make just the tiniest of mistakes e.g. in the implementation of your DMA engine, the FPGA will gradually clobber main memory until it hits something vital, giving you just enough time to realize what's going down before the system freezes or crashes. Then you have to reboot, fsck your hard drives (and hope for the best), and while trying to restore your session you discover that you've lost the last 5 minutes of work. I've been involved in the implementation of two DMA designs in my career and I can tell you first-hand that even the pros mess up (from time to time ;-)). I know I will mess up. Even if you're lucky and don't lose any changes, it can be utterly frustrating and kill your morale pretty quickly. Imagine it's late Tuesday night, you're trying to wrap your head around a particular issue and your workstation crashes for the third time in a row during a test and each time you have to start all over again, twiddling your thumbs, thinking about what went wrong, until Vivado is ready again—not to speak of the joy when manual recovery is necessary. It's a productivity killer if nothing else.
Anyway, I did have a spare (and sufficiently modern) PC for the PicoEVB at hand, but I still needed an adapter from M.2 2230 Key A/E to PCIe x1. These kind of adapters seem to be quite rare, but I eventually found an Amazon Warehouse deal for the Delock PCI Express Card > 1 x internal M.2 key E (Item No. 89889) for €18.03 total. While waiting for the adapter, I tried to find a spare hard drive that I could use to set up the secondary host PC for the eval board. What I dug up was a 120 GB 2.5" SSD, together with a vintage 2017 Intel NUC Kit NUC5CPYH featuring a Celeron N3060 (1.60 GHz) and 4 GB of RAM.
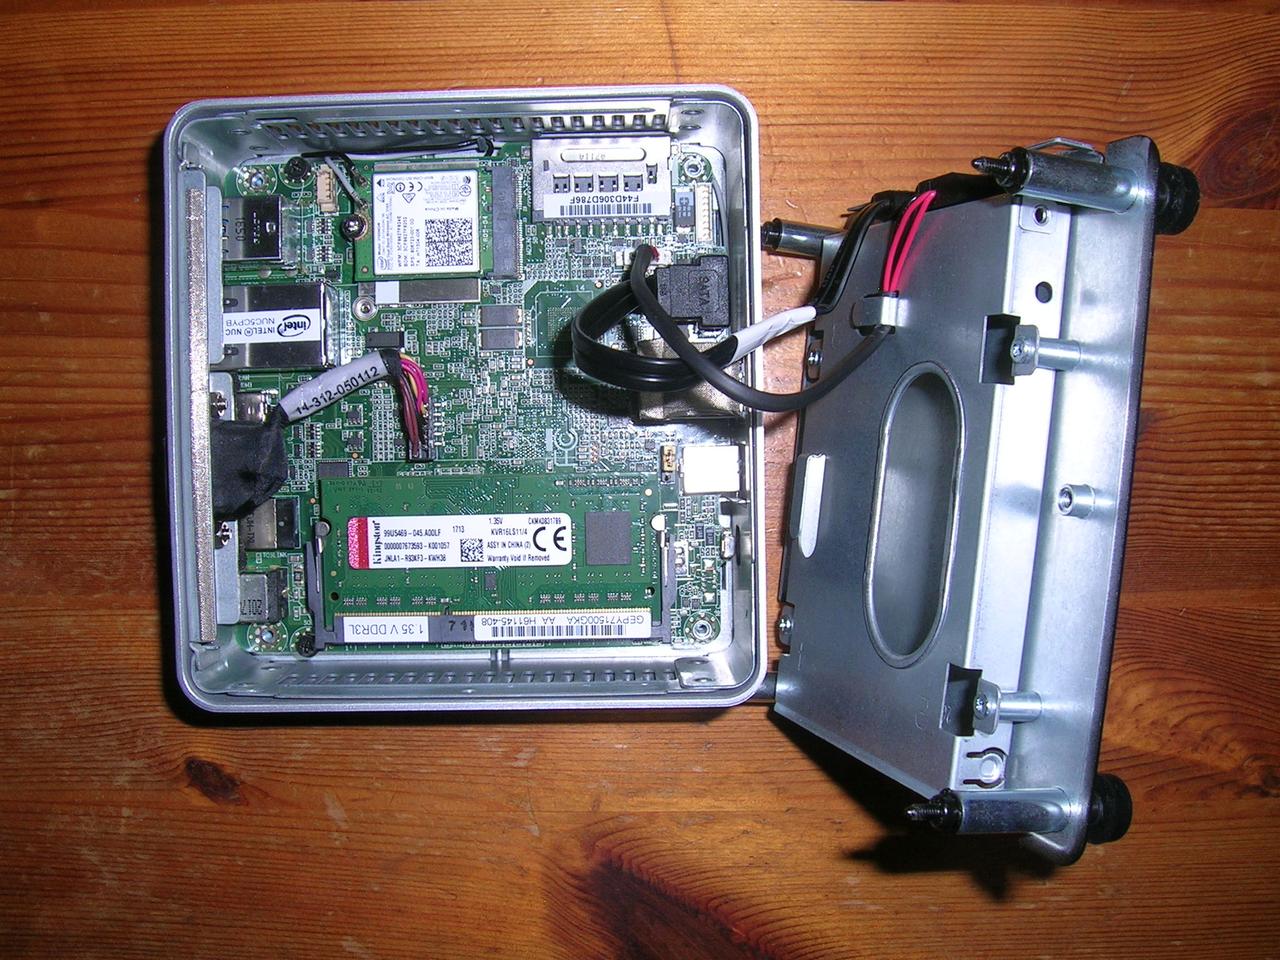
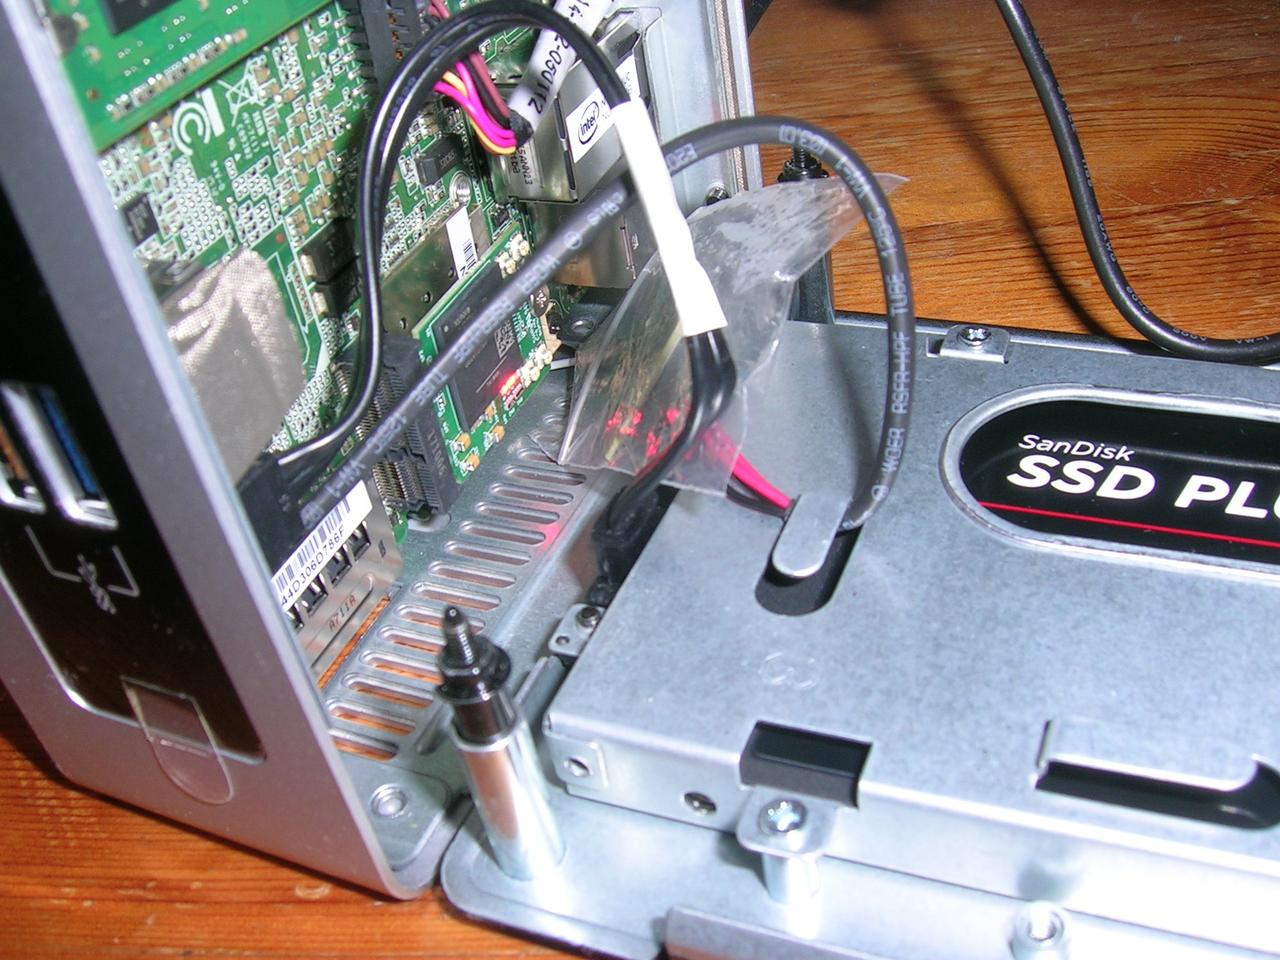
I originally bought all that stuff a couple of years ago for a media center project that (somehow) never materialized, but what proved advantageous now because the NUC supports PCIe Gen 2 aaand... has an M.2 2230 A+E slot. Populated with an Intel Dual Band Wireless-AC 3165 (+ Bluetooth 4.2?) adapter card. It does also have wired Ethernet though, and I really liked the idea of having a small, quiet little box sitting on my desk instead of some cobbled together, unwieldy and probably rather noisy midi-tower taking up half of my real estate. It's also much easier to stow away or transport. Now a wireless connection to the test box would've been the icing on the cake, but I was willing to make compromises. The Delock adapter hadn't arrived yet, so I decided to just go ahead with the NUC setup. I carefully removed the wireless adapter with the two antennas still connected. The antennas' female U.FL connectors only have a rating for a precious few mating cycles and I've already made some bad experiences even with larger connectors (probably of bad quality to begin with) deteriorating after just a couple of reconnects. So I shoved a small plastic zipper bag over the assembly and keep it softly bent out of the way, which seems to work pretty good so far apart from that it's not straightforward anymore to close the case cover (well, case bottom actually, although it's feasible with a bit of effort). Next I installed the latest stable Debian 10.5 (with SSH server enabled) and finally (cold-)plugged in the PicoEVB.
When the NUC is in Soft Off (S5) state, three red LEDs ('B', 'C', and 'A'—go figure!) on the PicoEVB board are on. Once the power button is pressed, LED 'B' (leftmost in the picture above) immediately starts to blink and continues to do so as long as the NUC is powered on. Furthermore two new devices show up, an FTDI USB to (ultimately, I guess) JTAG bridge and a Xilinx "serial controller":
-
lsusb
Bus 002 Device 001: ID 1d6b:0003 Linux Foundation 3.0 root hub
Bus 001 Device 003: ID 0403:6015 Future Technology Devices International, Ltd Bridge(I2C/SPI/UART/FIFO)
Bus 001 Device 002: ID 05e3:0610 Genesys Logic, Inc. 4-port hub
Bus 001 Device 001: ID 1d6b:0002 Linux Foundation 2.0 root hub
-
lspci
00:00.0 Host bridge: Intel Corporation Atom/Celeron/Pentium Processor x5-E8000/J3xxx/N3xxx Series SoC Transaction Register (rev 21)
00:02.0 VGA compatible controller: Intel Corporation Atom/Celeron/Pentium Processor x5-E8000/J3xxx/N3xxx Integrated Graphics Controller (rev 21)
00:12.0 SD Host controller: Intel Corporation Atom/Celeron/Pentium Processor x5-E8000/J3xxx/N3xxx Series SD Controller (rev 21)
00:13.0 SATA controller: Intel Corporation Atom/Celeron/Pentium Processor x5-E8000/J3xxx/N3xxx Series SATA Controller (rev 21)
00:14.0 USB controller: Intel Corporation Atom/Celeron/Pentium Processor x5-E8000/J3xxx/N3xxx Series USB xHCI Controller (rev 21)
00:18.0 DMA controller: Intel Corporation Atom/Celeron/Pentium Processor x5-E8000/J3xxx/N3xxx Series LPIO2 DMA Controller (rev 21)
00:18.6 Serial bus controller [0c80]: Intel Corporation Atom/Celeron/Pentium Processor x5-E8000/J3xxx/N3xxx Series LPIO2 I2C Controller #6 (rev 21)
00:18.7 Serial bus controller [0c80]: Intel Corporation Atom/Celeron/Pentium Processor x5-E8000/J3xxx/N3xxx Series LPIO2 I2C Controller #7 (rev 21)
00:1a.0 Encryption controller: Intel Corporation Atom/Celeron/Pentium Processor x5-E8000/J3xxx/N3xxx Series Trusted Execution Engine (rev 21)
00:1b.0 Audio device: Intel Corporation Atom/Celeron/Pentium Processor x5-E8000/J3xxx/N3xxx Series High Definition Audio Controller (rev 21)
00:1c.0 PCI bridge: Intel Corporation Atom/Celeron/Pentium Processor x5-E8000/J3xxx/N3xxx Series PCI Express Port #1 (rev 21)
00:1c.1 PCI bridge: Intel Corporation Atom/Celeron/Pentium Processor x5-E8000/J3xxx/N3xxx Series PCI Express Port #2 (rev 21)
00:1c.2 PCI bridge: Intel Corporation Atom/Celeron/Pentium Processor x5-E8000/J3xxx/N3xxx Series PCI Express Port #3 (rev 21)
00:1f.0 ISA bridge: Intel Corporation Atom/Celeron/Pentium Processor x5-E8000/J3xxx/N3xxx Series PCU (rev 21)
00:1f.3 SMBus: Intel Corporation Atom/Celeron/Pentium Processor x5-E8000/J3xxx/N3xxx SMBus Controller (rev 21)
02:00.0 Serial controller: Xilinx Corporation Device 7021
03:00.0 Ethernet controller: Realtek Semiconductor Co., Ltd. RTL8111/8168/8411 PCI Express Gigabit Ethernet Controller (rev 15)
So apparently the PicoEVB FPGA is already configured. I assume that the flash memory is pre-loaded with the (only, at this writing) sample Project-0, which includes an spi-loader implementation (the "serial controller"?). The README explains the behavior of LED 'B' quite nicely, but it also says that LED 'A' "lights up if FPGA is overtemperature or one of the FPGA voltage rails are out of spec"—which sounds rather worrisome. If that actually turns out to be the case, then there's nothing I can do about it right now, and probably at all I'm afraid. The FPGA is definitely not hot, not even warm, and also LED 'A' is on even in S5!? Maybe I'll double-check this with the Delock adapter in my workstation... we'll see.